POSTS
meta-cloonix
- 5 minutes read - 1057 wordsIntroduction
One of the features that I most like when using Yocto Project is the possibility to use qemu and test my custom image very early without the needed of any hardware board.
All of that is integrated when using Yocto Project. See more details about how to use in Using the Quick EMUlator (QEMU).
But running one qemu instance is not enough when I need to test how an application behaved in a network environment.
You can ending up like these commands:
A better way must exist to run that. So, why not a network emulator system?
I know that there are many network emulator/simulator systems. I’ve been reading this website Open-Source Routing and Network Simulation which has nice reviews about many network simulators.
What is cloonix ?
I was looking for some specific requirements when searching about the subject:
- integrated network simulation
- uses qemu
- able to run any Linux image
- a nice way to describe my network setup
- integration with DPDK and Open vSwitch
I’ve found cloonix. The source code is under AGPLv3 and free available at https://github.com/clownix/cloonix
cloonix seems to be very well designed and implemented, so I’ve gave a try reading and following the official documentation steps. After some exploration, it works very well. But how to use cloonix with my own Yocto images?
That’s why I spend a bit more time to better understand what were the needed requirements to build a Yocto image suitable to run with cloonix.
I recommend to take a look over cloonix website and discovery what else it can do.
Creating cloonix images
While the cloonix documentation has a very nice way to create additional VMs and also providing already ready-to-use VMs; I would like an easy way to use Yocto images with cloonix.
So, I’ve dug in cloonix source code and documentation to discovery how it works and how a Yocto image could be created.
I figured out that there are two main points:
- use the correct linux kernel append parameters
- configure the file ‘/etc/inittab’ (or systemd service) to pass the correct parameters to getty (or agetty when systemd)
Using the correct parameter, cloonix can access the guest using the hvc0 console and run two programs:
- cloonix_agent: an agent which receives command from cloonix, running in host
- dropbear_cloonix_ssh: a ssh daemon over cloonix_agent channel. So we can access the guest using ssh without a network connection
meta-cloonix
meta-cloonix is a Yocto/Openembedded layer-compatible which allows you to create a image and use it with cloonix network simulator.
The source code layer can be found here: https://github.com/joaohf/meta-cloonix and so far this has a image and additional bbappend files.
But in a long-term this layer could build and install the host tools to talk with cloonix instance.
Using meta-cloonix layer to create images
Clone meta-cloonix from https://www.github.com/joaohf/meta-cloonix repository and enable it in the file conf/bblayers.conf. See how to do this in Enabling Your Layer.
In the file conf/local.conf we need to add two additional configurations:
Enable the cloonix DISTRO_FEATURE:
DISTRO_FEATURES_append = " cloonix"Use the cloonix specific WKS_FILE:
WKS_FILE = "cloonix-qemux86-directdisk.wks"
These two configurations will enable an image which been created with:
- correct linux kernel append flags
- special configuration to enable inittab spawing a hvc0 console
meta-cloonix provides an image, based com _core-imageminimal, which we can use to build a basic image to test the Cloonix environment:
bitbake cloonix-image-minimalAfter the build, copy the image file to CLOONIX_BULK directory:
cp tmp/deploy/images/qemux86/cloonix-image-minimal-qemux86.wic.qcow2 $HOME/cloonix_data/bulkRight now we created a image suitable to use with cloonix with Yocto. Remember that you are free to install any kind of extra software and also enable other layers.
Building a network using cloonix
Now, we will work only with Cloonix command and graphic interface to build a small network within some nodes sending packets and a protocol sniffer, allowing seen what is going on in the network.
In this post we will build a script which does all the needed configuration.
The diagram below shows the network that I want to create:
          +---+
          |snf|
          +-+-+
            |
+---+       |       +---+
|kvm+-------+-------+kvm|
+---+      lan      +---+
See more about the cloonix objects used in this example here cloonix objects.
So far, our network has:
- two kvm guests (using the cloonix-image-minimal)
- a lan to connect these two kvm
- a snf (sniffer) listening all the traffic between the hosts
Below, the following cloonix script (I’ve borrow some ideas from clownix/freeswitch) is used to create all the objects:
 1NET=nemo
 2DEMOVM=cloonix-image-minimal-qemux86.wic.qcow2
 3CONFIGS=../cloonix_emqx/basic
 4
 5cloonix_cli ${NET} kil
 6cloonix_net ${NET}
 7cloonix_gui ${NET}
 8cloonix_cli ${NET} add kvm bird0 ram=800 cpu=2 dpdk=0 sock=3 hwsim=0 ${DEMOVM} &
 9cloonix_cli ${NET} add kvm bird1 ram=800 cpu=2 dpdk=0 sock=3 hwsim=0 ${DEMOVM} &
10
11cloonix_ssh ${NET} bird0 "echo" 2>/dev/null
12cloonix_ssh ${NET} bird1 "echo" 2>/dev/null
13
14cloonix_cli ${NET} add lan bird0 0 lan1
15cloonix_cli ${NET} add lan bird0 1 lan2
16cloonix_cli ${NET} add lan bird0 2 ser1
17
18cloonix_cli ${NET} add lan bird1 0 lan1
19cloonix_cli ${NET} add lan bird1 1 lan2
20cloonix_cli ${NET} add lan bird1 2 ser1
21
22cloonix_scp ${NET} ${CONFIGS}/bird1.config bird1:/usr/lib/emqx/etc/emqx.config
23cloonix_scp ${NET} ${CONFIGS}/bird2.config bird2:/usr/lib/emqx/etc/emqx.config
24
25cloonix_ssh ${NET} bird1 "systemctl enable emqx.service"
26cloonix_ssh ${NET} bird1 "systemctl enable emqx.service"
27
28cloonix_ssh ${NET} bird1 "systemctl restart emqx"
29cloonix_ssh ${NET} bird1 "systemctl restart emqx"
That script is very interesting. All that we need to do is describe the steps needed to create the environment. In short we have:
- line 5, do a cleanup
- line 6 and 7 starts a network and a graphic interface
- line 8-9 creates two KVM machines with 3 network interfaces
- line 11-12 tries to connect over ssh to check if the machines are up
- line 14-20 creates and connects the network
- line 22-29 tries to configure and start an application
The commands cloonix_ssh and cloonix_scp are very handy to fix and configure the machine without need a working network.
Check the working script here: joaohf/cloonix_emqx.
After all that commands, the following components have been appeared in the cloonix_gui:
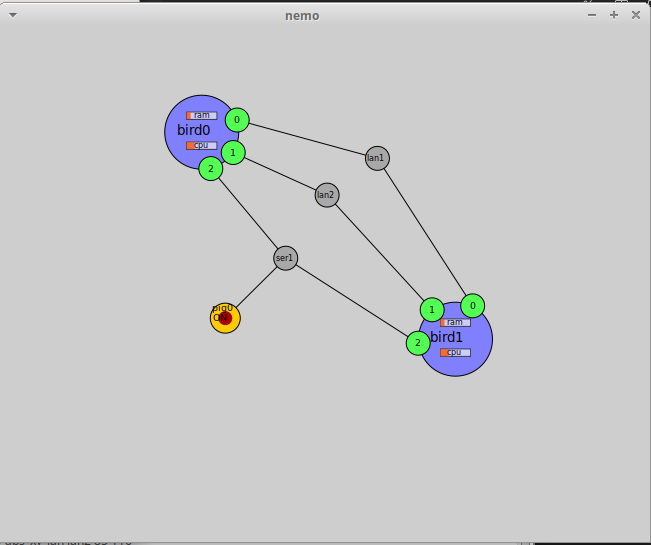
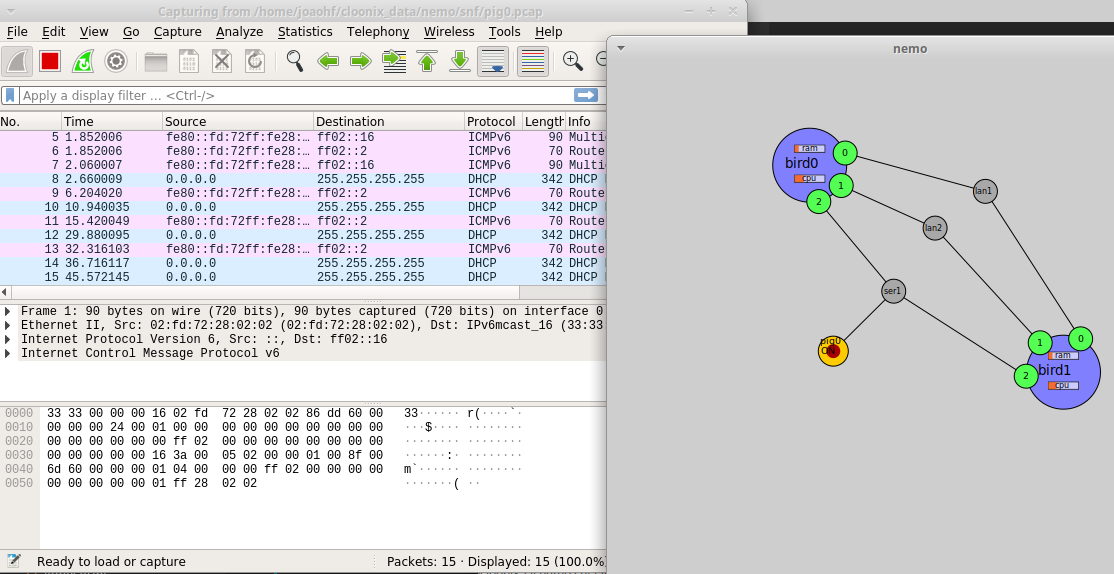
As a plus, cloonix has a way to attach a sniffer and listen packets.
What else I can do with that ?
The meta-cloonix Yocto layer allows use any image, created with Yocto, to work with cloonix network emulator. You can install any software, create a cloonix script and test how is the software behaviour inside a controlled network.
Take a look over the cloonix repository and the official website to get more ideas about what else you can do.